
Building a pull up bar was a bit easier than it sounds, but with some ingenious hustling we made it happen.
This summer I went to Dublin, Ireland to visit my good friend Owen and his wife Denise.

For the past several months before my travels, I had shared with Owen my passion for Calisthenics.
I am not entirely sure, what the motivation was, it could just be that, Owen wanted me to feel at home while I stayed with them for 10 days, but we decided to build a pull up bar in the back of his house.
We wanted to build it with little to no money, and if you exclude the power tools, man hours put in to gathering the materials, and the actual build time, we built it for FREE.
Actually, we were able to do it for FREE, by bartering.
Step 1: Find the materials
We first found the scaffolding galvanized steel pipes at a local place that happened to be a client of Owen’s. His client is an architectural scrapyard that has a lot of great stuff. While we were there, we were rummaging around for anything that we could use to build the frame of the pull up bar.
When one of the workers there showed us these scaffolding pipes. It was perfect. The ideal height, the length of the two vertical scaffolding pipes were 6 1/2 feet high and had attached square bases and a separate pipe that was 3 1/2 feet wide that we would use for the actual pull ups.
What made it so great was that the diameter of the pipes that we found were wider than the normal pull up bars you will find in the park, which will help tremendously with grip strength. They were 2 inches in diameter.

The other great advantage was that it was galvanized steel making this thing almost rust proof. The picture above is actually of the vertical base pipe and the horizontal bar, the rusted part that is showing through just above the tape measure is actually a rusted old piece of pipe that we welded to the horizontal bar to then later insert it at the top of the vertical base pipe.
And the final benefit was that the scaffolding had attached square stands, with a square metal base perimeter of 8 inches on one and 11 1/2 inches on the other, so the base was already to go, we just needed to mount the base to the concrete floor and we were good to go. Although the base was a bit rusted it was still a great advantage, especially considering it was FREE.

We were able to get the three scaffolding pieces: the two 6 1/2 vertical stands with attached bases and one 3 1/2 foot wide pipe for nothing, because while we were there, Owen helped the owner with a computer virus issue he was having that took no longer than 30 minutes. So the cost of the materials: FREE
Step 2: How to connect the free-standing middle steel piece to the two base units?
The tricky part was getting the vertical scaffolding bar (which would be used to do the actual pull ups) to attach some how to the two 6 1/2 feet vertical scaffolding poles.
So with a little help from our friends, or more like barter, we were able to get it done.
We loaded one of the vertical scaffolding stands and the pipe we would use for the horizontal bar into his car and off we went.
Owen has a friend that owns a body shop, and as it happens in most body shops, they had welding gear. The owner, found an old piece of rusted pipe 1 1/2 feet long and 1 1/2 inches in diameter, the circumference of the rusted pipe was perfect enough to slide into the tops of the two vertical scaffolding stands.
Brilliant! I must say, we would have never have thought of that.
He cut the 1 1/2 foot pipe in half and welded each piece to the horizontal bar, and in effect created a “U” shape with the two cut pieces. The diameter of the pipe was 1 1/2 inches, narrow enough to be inserted into the base vertical scaffolding pipes. As you can see it was an old rusty piece of pipe but it worked fine for what we wanted to carry out, which was connecting the vertical post to the horizontal pipe.

All we needed to do was insert the new invention on top of the two scaffolding stands and we were good to go.
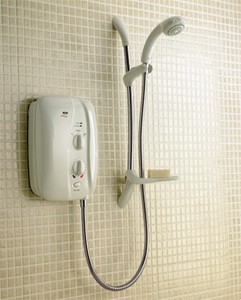
In return for his welding help, we helped the owner of the body repair shop with the installation of a new electric shower (heater/pressure). In Ireland, the water pressure is not so great, so many of the homes have a special apparatus like the one below.
As Owen was good with electrical installations, we installed the shower electric water heater and pressure, and I aided as his handy dandy assistant. It took us about an hour of our time, so the cost of the welding: FREE
Step 3: Putting it all together
Now that we had all the pieces, we were ready to begin putting it all together.
Lucky for us, Owen has a nice piece of concrete just outside his patio front door. Also, we were fortunate enough that he had all the power tools, bolts and screws to actually put everything together.
The two scaffolding stands already had four holes in the bases to easily drill into the concrete to secure it down.
We measured the distance from the wall to give enough space (28 inches from the pull up bar to the wall) and then we proceeded to lay the stands down and fasten to the concrete.
Owen first drilled the four holes before laying the stand down use water to clean out the holes. Then he used reinforced anchors that once drilled into the holes in the concrete would expand to make sure that the bolts would not go anywhere.
Once we had one stand done, we just repeated the process, of course measuring so that the two stands were equal distance not to far apart to insert the horizontal bar.
After that, we slipped the horizontal bar (with the the welded pipes) into the holes at the base of each the vertical stands, and we had our pull up bar.
And best of all it cost us nothing.
As you can see the adjoining wall came in handy when wanting to practice more advance moves like levers or muscle ups.

Of course, it helped tremendously the Owen had all the right power tools, but really we just used a drill and some 6 inch bolts. The rest was manual labor.
We ended up putting two wood beams, one on each side of the vertical scaffolding bars to give it more support, and cut down on the swaying. With the wood supports it was super sturdy. (The wood supports cost $5 however Owen had an extra wooden beam at home that we could have used, instead of buying one.)
Owen added blue duct tape for better grip and a middle foam piece for practicing muscle ups.
In conclusion, where there is a will there is always a way, you just have to have the want and persistence to make it happen. And a little bit of good luck also can help.
Here is the last image of the pull up bar:
